Wednesday, April 27, 2011

My first attempt at editing in Camera Raw

It's the classic argument- JPEG vs.Raw.  I shoot so many pictures every week right now, that I have felt comfortable with my jpeg files, they are smaller, and my opinion if you shoot in camera correctly you won't need to edit them extensively.  It saved me money for new hard drives!  Well, I just got a very large card that is capable of storing thousands of high-resolution images so I am considering switching to Raw.  And I always knew there was the option of editing a JPEG in Camera Raw in Photoshop and Elements, so today I finally tried it.  I am SOLD!!!! Would I use it every day, no...but on important images....ABSOLUTELY!!!!  It is very easy when you are in Editor in PSE to go to File -> Open As -> Camera Raw -> and a whole new world opens up!
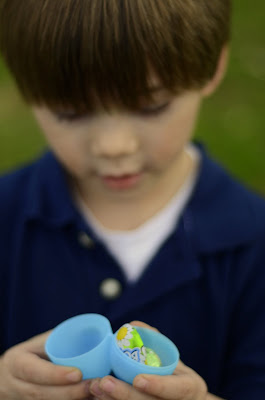
Here is an example:
 Well, this picture could have been cute, but I had just been shooting inside and I didn't re-adjust my settings when I went outside so I over-exposed this one big time.  White balance was off, too.
 When I went to edit this in PSE I had to darken the whole thing because I had to bring down my blown-out highlights...the problem is...I totally lost the sparkle in his eyes.
Warm colors, better lighting, and look at his eyes sparkle!!  I know I could have done more with it, but I was so impressed with the stuff I could turn up and down that I just slid a couple things around, and put it up here! I am so glad I tried it.

Tuesday, April 26, 2011

Training Mini Cooper


I have had a blast training this handsome puppy! He is smart, tons of fun, and well behaved.  I know he is going to be so happy when he is reunited with his family on Saturday now that he has more manners!
We were out today enjoying Spring.  He was bringing me sticks and leaves and celebrating the warmer weather.  
So sit. stay. and have fun looking through these photos!


Make Your Own Camera Strap

I found this tutorial on I Heart Faces and I really want to try it now!!!

It looks really easy and affordable, too!

DIY Tutorial – How To Make Your Own Camera Strap

November 2, 2007

Written by Our Special Guest: Cheryl from TidyMom
As soon as I got my new camera I knew that I wanted one of those cute camera straps I’ve seen around. It never dawned on me that most of them were just simple covers made to go over your strap. By making them myself I could have a whole wardrobe for my camera to suit my mood and MY outfits!
Isn’t she BEAUTIFUL? LOL
I thought some of you might like to jazz up your camera straps as well, so here’s how I did it! These are really easy to make. My Nikon strap is about 1.5″ wide, so I made these to fit that size. You can make these 2 sided with contrasting fabrics (which is what I did) or you could do them in all the same fabric, just cut your initial piece twice as wide and skip step #4.
You will need fabric, paper, pen, scissors, pins, fusible interfacing, thread.
1. Fold your strap in half and trace it on a piece of paper (I used a brown bag)

2. Add a 1/2″ all the way around your pattern you drew. This is your seam allowance
(I made mine about 27″ long).
Cut out paper pattern.
3. Fold your fabric in half and place your pattern on top, with the straight short edge against the fold of the fabric. Cut two pieces.

4. Sew the strips right sides together, then press seam open.

5. I made mine padded with fusible light fleece interfacing. You need about 5″by 27″. This is optional of course, I like the feel of the padding and think they look nicer, but you can skip this step if you don’t mind the hard strap. Iron on the fusible interfacing according to directions, and trim excess.

6. Fold one end in about one inch, and then again over one inch to hide the seam and make it have clean finish. I then sewed three lines, 1/4″ apart so the ends will be more sturdy and it looks more polished.
Do this this to both ends. ~See how nice they look?

7. Pin the right sides together.

8. Sew right sides together. I think I did about 1/4″ seam, but you can judge according to what will fit your strap. Just remember, you want it about 1/2″ larger than your strap so it’s easy to slide on and off.

9. Trim your seam allowance so it’s not in the way when you slide your strap in.

10. This is the hardest part…..turn inside out. I used a plastic spoon to help push it thru.

Then I pulled thru with my fingers.

1 1. Then iron your cover, feed your strap through and you’re FINISHED!

Easy right?! I had so much fun I made four of them!
By the time I made the forth one, I think it only took me 15 mins from start to finish.
(I played around with different sizes to see what worked the best)
I bought 1/4 yds. of all my fabric and I have enough to do a few more – so I’m sure you could get by with 1/8 yd of each fabric.

Now go make yourself one……. or four!! LOL
You’ll have even MORE fun taking pictures when you look all cute with your stylish strap!!
post signature

Monday, April 25, 2011

Easter Faces

We had a family reunion over the Holiday weekend, and it was so much fun to catch up with family...some I hadn't seen in a very long time.  I snapped a bunch of pictures of the little ones, and caught some adorable smiles.  They must run in the family! ;)


 HAPPY EASTER!!!!


I Heart Faces Pet Theme


I love when they do the Pet Theme over on I <3 Faces!
This is beautiful "Amy" a Ragdoll Kitten.  She is 6 months old and she is so fun to take pictures of, 
because she knows she is pretty!  
Her dreamy blue eyes are to die for!

Friday, April 15, 2011

What people think about you

This week the theme for our Project 52 is "What people think about you." Well, this is how people always see me. I always have my camera in my hands. I am trying to break in to the professional photography business, so it is important what people think of me when I am holding a camera. I want them to love and appreciate my work...I want them to take me seriously....I want them to be inspired by my photographs.
It was fun to do a self-portrait.  That was a first for me, and even though I took all of these in a mirror, I like that you can't see the mirror.